Plex Movie Streaming
“I am looking to put my movie titles onto my Drobo 5n and pointed my dedicated Mac mini running Plex Server and running Plex Theater, that’s connected to a 4×4 matrix switch that plays to all my TVs in my house. Once I have all my movies uploaded in the right format, I would like to be able to play them on any device (mainly my TVs, or my 3 iPhones and 3 iPad Minis.) My movies are DVD and Blu-ray (most with digital copy). Can you help me? Thanks!”  Blu-ray and DVD movie is becoming more and more popular, many people choose to enjoy movies with a blu-ray or dvd player, but sometimes it is not so convenient in this way, so they prefer to store BD/DVD on Drobo 5n or stream via Plex for playing directly with other portable devices or TV as above. But as we know, Blu-ray movies and DVD movies are all protected, we will need third party software to remove the protection and rip Blu-ray/DVD to the format you need. After looked up best blu ray ripper for the mac through google search and I found Pavtube BDMagic for Mac which was always considered the best by every reviewer. After trying one other one I agree with it. With this versatile Blu-ray ripping tool, you can easily remove all kinds of Blu-ray and DVD copy-protections and convert Blu-ray/DVD to MKV on Mac, the output quality is still as vivid as original. And a lot of videos formats are supported to output, so you are able to watch them on your TV/smartphones/tablets.How to backup Blu-ray/DVD to MKV for storage on Drobo 5n or Streaming via Mac Mini Plex Download and installed the software and experience all the functions now. If you wanna a Windows version, please go to Pavtube BDMagic. Step 1. Launch the best Blu-ray Ripper for Mac and load Blu-ray discs.
 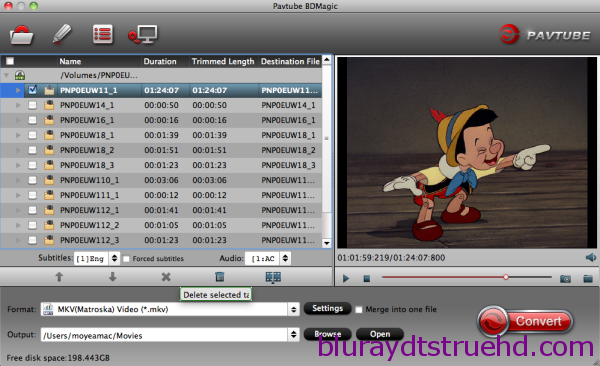 Step 2. Click “Format” to find “Common Video” catalogue, select “MKV(Matroska) Video (*.mkv)” for storing on Drobo 5n or playing on TV via Mac Mini Plex. Also you can choose “H.264 Video(*.mp4)” for enjoying on smartphone or tables.
 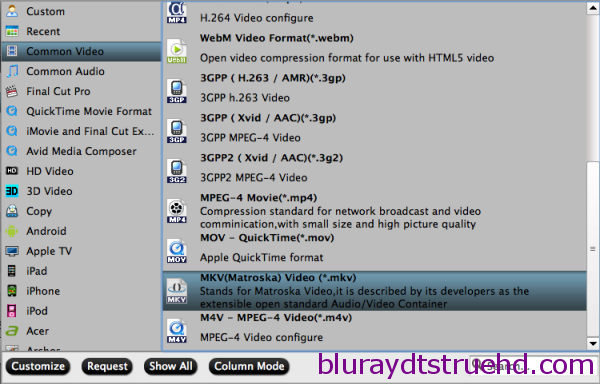 Tip: You can click settings button to adjust the output parameters, such as resolution, bitrate, frame rate, etc. For example, if you want to maintain the 5.1 audio effect, you can choose 5.1 audio in settings.
 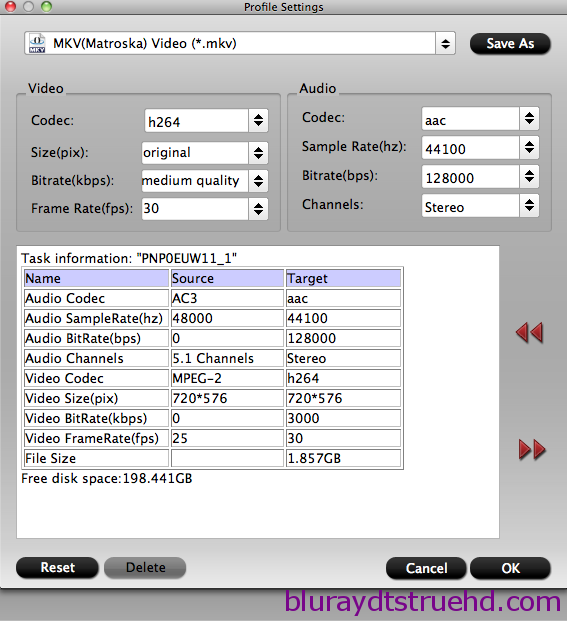 Step 3. Click “Convert” to start backing up Blu-ray to MKV, when completed, click “Open” to find the generated files. Now transfer the converted Blu-ray/DVD movies to Drobo 5n or import them into Plex server on Mac Mini for streaming and playing on TV. Obviously, it is easy to backup blu-ray to MKV format without any audio and video out of sync issue. Have a try now! More features of BDMagic for Mac:
- Directly Copy will help to backup the 100% intact Blu-ray/DVD main movie and output an m2ts/vob files with multiple audio and subtitle tracks.
- Full Disc Copy can 1:1 backup the entire Blu-ray and DVD with original structure and chapter markers.
- Convert Blu-ray/DVD to many other devices like iPhone 5S, iPad Air, Samsung Galaxy S5/Galaxy Note 4, Galaxy Tab s, Amazon Kindle Fire HDX, Surface Pro 3, etc.
- Meanwhile, there are many Money Saving Software Bundles, such as BDMagic for Mac($49) + DVD Creator for Mac($35) = Only $49.9, Save $28.1 for rip blu-ray and burn to DVD which will help you save more money. Go to find the one you need.
And it is a fabulous way to turn Blu-ray into ISO files for Popcorn Hour C-300 Playback,backup Sabotage Blu-ray Disc to Asus O!Play Mini Plus or play Blu-ray/DVD movie via ViewSonic NMP-708.
More Cast DVD Movie to Chromecast through Plex Media Server Encode/Decode H.265 Files to PS4 for Playing Play 4K UHD Videos on 4K HD TV for 4K HD Experience Upload Canon XC10 XF-AVC 4K MXF to YouTube/Vimeo/Facebook Backup Top 10 3D Movies on Blu-ray/DVD for Watching Watch DVD on TV without DVD Player Convert HD Videos to H.265 MKV for Playing on Windows Transfer iTunes Movies to Dropbox for playing at Anywhere Src How do I Rip Blu-Ray, DVD Discs for storage onto Drobo 5n and copy to Mac Mini Plex for Use on TV
Let's focus on ripping and casting DVD movies to Chromecast via Plex with the fast DVD to Chromecast ripper in the following text. Using Google Chromecast means an easier way to cast all your favorite entertainments and apps to bigger TV from smartphone, tablet or laptop. Partial its charm relies on the powerful streaming ability. till now, Chromecast is still a special existence form with peculiar format acceptance. Most of DVD fans want to copy DVD collections to the google Chromecast for streaming on Plex, but failed. If you got into the same trouble, you’re in the fight place. The article shows the best workaround for copying DVD to Chromecast for streaming via Plex by ripping DVD to Chromecast friendly video format on Windows or Mac. Tips About Plex and Chromecast: Chromecast How-to Guide | Convert VOB to Plex | Blu-ray/DVD ISO on ATV 3 through Plex | iTunes Movie via Plex | As it claimed, Chrome browser is a very capable video player that will have no trouble of handling various video types such as WebM, MP4, MPEG and MKV. However, it is not available to cast DVD movies to bigger TV via Chromecast media mirror, unless Pavtube DVDAid Movie Copying & Ripper Software does a favor. it's not like that you can directly cast movies played from your laptop's DVD drive or hard drive. What you can do is to rip DVD to Chromecast compatible format like MP4 and then use the Plex Media Server playback workaround to stream the movies to Chromecast. Read the review.By testing, this top DVD Ripper for Chromecast it’s able to rip the latest commercial DVDs like The Hobbit: The Battle of the Five Armies DVD, Jurassic Park DVDs, Furious 7 and so on. With it, you can convert DVD to almost all regular video formats like MP4, MOV, MKV, FLV, WMV, AVI, etc. and even extract MP3, WMA, FLAC, OGG, etc. audio from DVD movies. Best of all, it allows you to copy your DVD to hard drive with original structure or main movie only. Furthermore, it continuously upgrades to offer you up-to-date DVD backup solution, making it a top contender and worthy of consideration by any DVD to Chromecast converter buyers. If you're using a Mac, please turn to Pavtube DVDAid for Mac, which enables you to convert DVD to Chromecast through Plex on Mac OS X (Yosemite). Guide: Ripping DVD off for streaming via Plex to Chromecast with friendly format


Step 1. Load DVD MoviesInsert movie disc into the DVD-ROM, on the software, click “load DVD” button. It doesn’t necessarily to be a DVD optical media, it can also be an ISO/IFO files to convert to playable digital file format.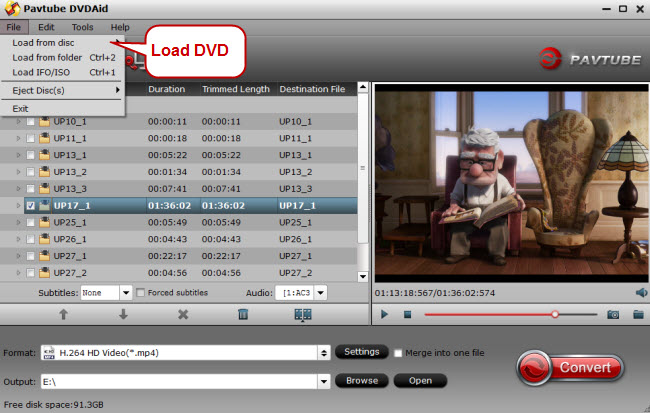 Step 2. Select Chromecast compatible formatsClick on the drop down menu of the Format, select “Common Video > H.264 Video(*.mp4)” or "Common Video" > "H.264 High Profile Video(*.mp4)" as the target format. It fits on Chromecast/Plex for playback.
  Then, you might tweak the output parameter settings to get better video/audio quality before the DVD to Chromecast process. For the most part you can leave this alone; the default optimized settings should be fine as is. Step 3. Start ripping DVD moviesAfter all necessary settings, you can just click the "Convert" button to start converting your DVD movies to Chromecast. After the conversion, click Open to get the output files.Step 4. Stream/Cast Local DVD to ChromecastYou use Chromecast to cast or stream the converted DVD video from PC or Mac to HD TV or display:At first, download Chromecast mobile apps (such as Plex) on iPhone, iPad, iPod or Android, or web apps using Google Chrome (on Windows, OS X, and Chrome OS) through an extension on your computer. These apps can help you stream DVD movies by the Chromecast to TV within a local version of the Chrome browser.Read More:
A VIDEO_TS file is a DVD folder file, mainly containing all data for the DVD movies. It totally contains three kinds of files inside: VIDEO_TS.IFO, VIDEO_TS.BUP, and VIDEO_TS.VOB. Yeah, you can view Video_TS files on your computer and DVD players. However, if you want to put your VIDEO_TS movies on Plex, you’ll find it’s difficult to do that since Plex doesn’t recognize VIDEO_TS format.
 “I have a number of ripped DVDs that maintain the original DVD file structure. VLC can play them fine. So can built in DVD players. I like Plex for the way it catalogs and organizes the files for me, but it never played that DVD Video_ts structure back very well. Any solutions?” My purpose is this page is to introduce a simple way to stream VIDEO_TS to Plex for playback with ease. As far as I know, Plex supported media file formats are restricted to MKV (H.264), MP4 (H.264). To get Video_TS on Plex server, the VIDEO_TS movie file needs to be converted to H.264 video, with the file extension like .mkv or .mp4. Therefore, if you want to enable Plex read and play your VIDEO_TS movies, a VIDEO_TS Converter is needed. Here Pavtube Video Converter Ultimate (Read review) is recommended to rip VIDEO_TS to Plex Media Server. With it, you can convert (3D) Blu-ray, DVD, Blu-ray BDMV folder, DVD VIDEO_TS folder, ISO/IFO files to Plex playable (H.264) MP4, MKV format with perfect audio and video sync in HD quality. In just a few mouse clicks, you’ll be able to view the VIDEO_TS on your Plex smoothly. Just download the program and follow the tips below to easily make Plex Media Server play VIDEO_TS files.
 Convert DVD VIDEO_TS folder to Plex supported file format Step 1. Run the best VIDEO_TS Converter, click “Load from folder” to select and load the Video_TS files you want to convert. All the loaded files will be displayed on the left source pane and you can choose the titles to rip.
 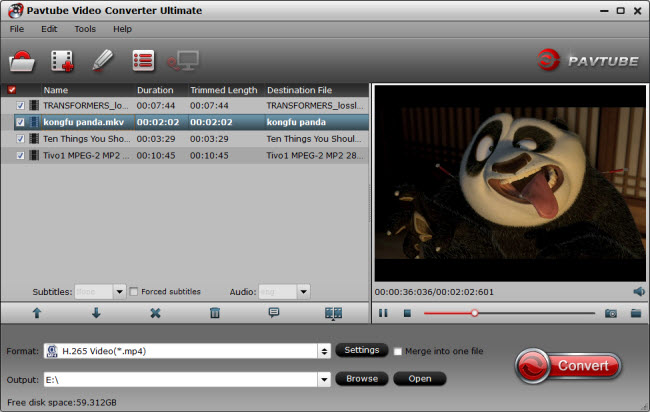 Step 2. Click Format > Common Video and set output video format as H.264 High Profile Video(*.mp4). The reason mp4 is the target format is that by packing the videos in mp4, the file size will be reasonable small and the video quality remains.
 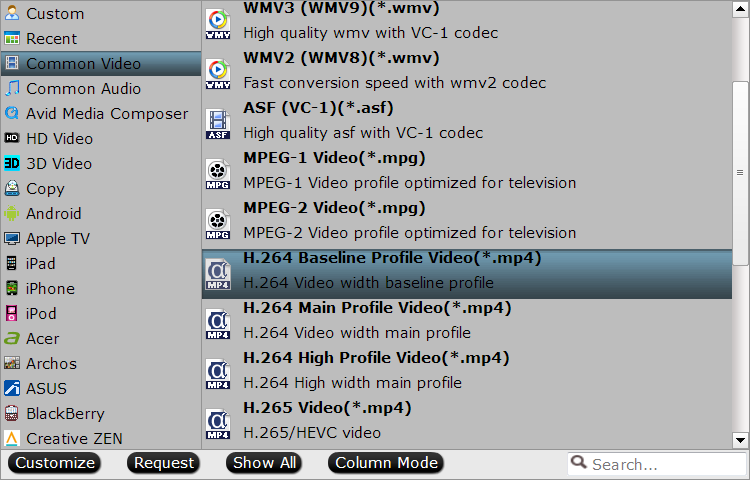 Step 3. If you like, modify profile settings such as video size, bitrate, frame rate, etc to get optimized video and audio playback. Note: Plex just plays the MP4/MKV files with H.264 video codec and AAC audio, you need to click the Settings icon to set the correct video, audio codecs. Step 4. Return back to Video Converter Ultimate main interface, and hit the “Convert” button to start encoding DVD VIDEO_TS to H.264 MP4 for Plex playback. After the conversion, click Open to get the output files. Afterwards, you can either stream them or add the converted videos to Plex media library. 1. Download and install Plex. Click on the Computer download. 2. Create a Plex account. 3. Click the “Already have an account” link to supply your credentials, or create one now. 4. Name thyself. 5. Create your media library by clicking on the Add Section button. 6. Add Channels, or other third-party sites that you can tap into using a Plex-friendly app, by selecting them on the next screen. 7. You can edit Plex’s default settings by clicking on the wrench and screwdriver icon in the window’s upper-right. 8. Stream your stuff by tuning into Plex using your favorite DLNA-friendly device Now you can grab the Plex apps for iOS or Android to watch your VIDEO_TS files via Plex anywhere you like easily. Continue Reading:
Src:Easiest way to convert Video_ts folder for use on Plex server
Step 3. If you like, modify profile settings such as video size, bitrate, frame rate, etc to get optimized video and audio playback. Note: Plex just plays the MP4/MKV files with H.264 video codec and AAC audio, you need to click the Settings icon to set the correct video, audio codecs. Step 4. Return back to Video Converter Ultimate main interface, and hit the “Convert” button to start encoding DVD VIDEO_TS to H.264 MP4 for Plex playback. After the conversion, click Open to get the output files. Afterwards, you can either stream them or add the converted videos to Plex media library. 1. Download and install Plex. Click on the Computer download. 2. Create a Plex account. 3. Click the “Already have an account” link to supply your credentials, or create one now. 4. Name thyself. 5. Create your media library by clicking on the Add Section button. 6. Add Channels, or other third-party sites that you can tap into using a Plex-friendly app, by selecting them on the next screen. 7. You can edit Plex’s default settings by clicking on the wrench and screwdriver icon in the window’s upper-right. 8. Stream your stuff by tuning into Plex using your favorite DLNA-friendly device Now you can grab the Plex apps for iOS or Android to watch your VIDEO_TS files via Plex anywhere you like easily. Continue Reading:
Src:Easiest way to convert Video_ts folder for use on Plex server
Watch Video Library at home through Plex Media Server
Many people nowadays set up their Plex Media Server to organize and access their videos from a wide range of devices, like Android devices, iPhone, iPad, Windows Phone, Windows RT, etc. However not all video formats are suitable for playback with Plex. For example, it can’t streem a Blu-ray or DVD movie without converting it to the appropriate video types. Fortunately there is a powerful video encoding tool can help you convert almost all videos for playback on Plex Media Server. And best of all, this video encoder is an open source project, everyone can free download and then enjoy your Video Library at home through Plex Media Server.
Here, I will show you this all-in-one Video Converter Ultimate for Plex from Pavtube. Read the review. This is called Pavtube Video Converter Ultimate – which is professional on fastly transcoding MKV,AVI, WMV,VOB, RMVB, FLV etc and Blu-ray, DVD discs to Plex Media Server with MP4 format (the most compatible video format for Plex Media Server) without quality loss. Here our task is to encode all kinds of movies to MP4 for Plex Media Server. The process is much simple. Follow below guide to start Video Library to Plex conversion.
Get ready for the conversion? Just download the right version and follow the guide to import Blu-ray/DVD and other movies to Plex with ease.
Step-by-step: How to convert all of videos from Video Library via Plex
Step 1: Add Video Files
Install and run the Plex Video Converter Ultimate to your PC, click “Add Video” to import your source .vob, .mpg, .avi, .mkv videos. Batch conversion is supported so that you can add multiple files. You can also convert Blu-ray/DVD or ISO/IFO files for Plex.
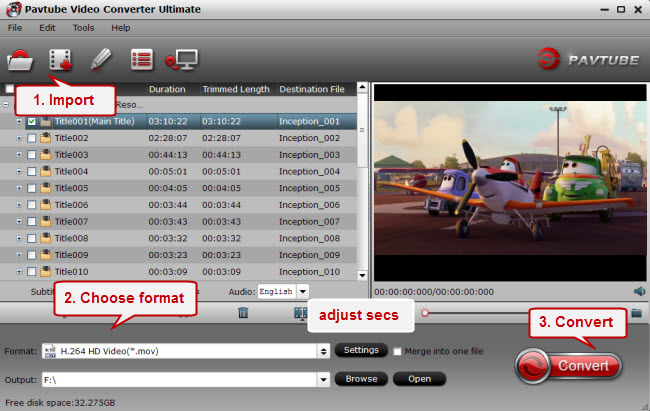
Step 2: Select Output Format
Click the “Format” option, and choose MPEG4, MOV from Common Video profile list. If you want to keep 1080p resolution as source movies, you can choose HD Video -> H.264 HD Video(*.mp4) for Plex Media Server.

Tips: Adjust the video and audio parameters including the Bitrate of Video & Audio, Video Size, Sample Rate, Frame Rate, Audio Channels, etc., by clicking the “Settings” button on the main interface for getting the best quality.
Step 3: Start All videos to Plex conversion
When all the settings are OK, click “Convert” button to start converting Blu-ray/DVD or AVI, VOB, MKV etc to MP4 video for Plex Media Server. It will automatically encode MKV/VOB/AVI to Plex Media Server compatible video files. Once the conversion is finished, click “Open” to quickly find the converted movies. Then, Plex will recognize, catalog, play and stream them just fine. Enjoy.
Now, you can put your large stack of Standard Def Blu-rays and DVDs and all kinds of movies to your Plex and watch primarily from your video library at anytime!
More:
Convert Blu-ray to Plex Server for Playing on Plasma TV
Stream iTunes Videos to Xbox One via Plex
How to Start Plex on Your Side with Chromecast, iOS, Android, Apple TV, NAS?
Yify to Plex: How to Stream Yify Videos via Plex
WTV to PS4 Tips - Enjoy WTV files on PS4 with Suitable Formats
Src:
Backup your Video Library via Plex when Staying at home
Overview: This is an instructional article on showing how to upload DVD to Dropbox by ripping and copying DVD to a Dropbox readable format. Dropbox is a mobile document and media storage tool that allows you to sync you files online for backup. Anything like movies and music you save to your computer can be saved to your Dropbox. If you are looking for a way to upload DVD to Dropbox for viewing as above thread mentioned, read on to find the best solution.Hot Search: Dropbox Transfer Guides | iTunes to Dropbox | Blu-ray to Dropbox | Compress videos to Dropbox | As you know, Dropbox doesn't support DVD video format. If you have some nice DVD movies and want to add to Dropbox for streaming and playback on iPhone, iPad, Android, Surface 3, BlackBerry, Plex, PS4/3, PSP, PS Vita, WDTV, smart TV and more media devices, you have to rip and copy DVD to Dropbox readable formats, as MP4, MOV, etc.To do so, a DVD ripping software is essential. Here Pavtub DVDAid is recommended to you. This DVD ripping tool can rip any encrypted DVD and convert DVD to Dropbox readable MP4, MOV etc. formats as well as other popular formats, like rip DVD to AVI, MKV, M3U8, H.265, WMV, MPG, FLV, SWF, M4V, etc. on Windows (including Windows 10, 8.1 and 8). For the video size limit of Dropbox site, the built-in editor also allows you to extract DVD clips with the very part you want. Or, you can just choose to rip certain chapters of a DVD as you like.If you are a Mac user, please turn to DVDAid for Mac, support Mac OS X Yosemite 10.10, 10.9 Mavericks, 10.8 Mountain Lion, 10.7 Lion, Snow Leopard10.6, Leopard 10.5. Now download the right version of the program and follow the guide below.
  Other Download- Pavtube old official address: http://www.pavtube.cn/dvd_ripper/- Cnet Download: http://download.cnet.com/Pavtube-DVDAid/3000-7970_4-76158510.htmlPart I. How to rip DVD to Dropbox readable video format for uploading?Step 1. Load DVD moviesInsert the DVD disc into your computer’s DVD drive and run DVD Ripper. You can click the "Load DVD" button to load the DVD files to the program. DVD ISO/IFO, VIDEO_TS folder are supported also.
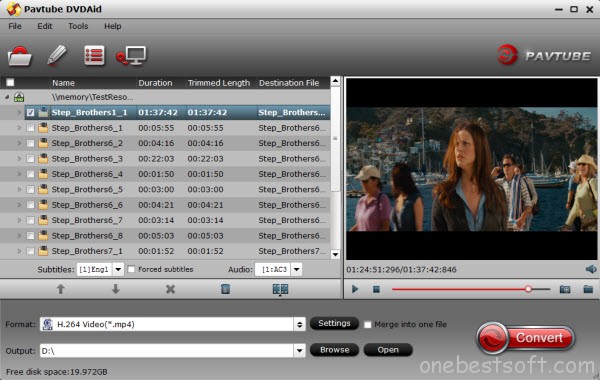 Step 2. Specify output formatAs has been stated above, Dropbox supports MP4, etc video files. So you can just select "Common Video" > "H.264 Video(*.mp4)" as the output video format. Also you can transfer your DVD to media hub, Cloud Storage and External Hard Drive/Thumb Drive, Flash drive, Plex for storage and playback.
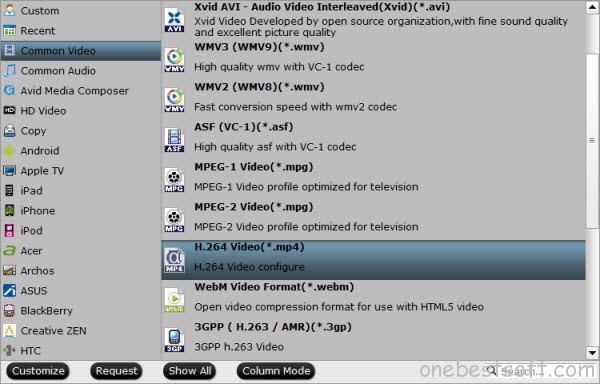 Step 3. Trim/Edit DVD filesSince Dropbox has limitations about the uploading video size(If you only have the free account, you only have 2 GB of space), please pay attention to the video size when ripping DVD movies for Dropbox. Here we should highlight the trim function on this software. Just click "Edit" to trim the DVD videos to get the very part you want. Besides trimming, cropping, adding watermark, adjusting special effect, are well supported as well.Step 4. Start converting DVD to DropboxWhen all these settings are ready, you can click the "Convert" button to begin the DVD to Dropbox conversion. When the ripping is done, you can click on "Open" button to locate the ripped videos.Part II. How to Upload the ripped DVD movies to Dropbox for storage?1. Sign in to the Dropbox website.2. Click the Upload button from the very top of the window. The upload button.3. A window will appear. Click the Choose File button and then select the file on your computer that you’d like to add to your Dropbox.4. Choose as many files as you like, and then click the Start Upload button.5. The window will disappear, your files will start uploading, and you'll be shown a progress indicator. That’s it, you’ve added files to your Dropbox!Detailed steps can be found here.
 That's all the instructions to rip and upload DVD to Dropbox for sharing. More Tips
Source: http://filmholics.tumblr.com/post/105430096750/upload-dvd-to-dropbox
That's all the instructions to rip and upload DVD to Dropbox for sharing. More Tips
Source: http://filmholics.tumblr.com/post/105430096750/upload-dvd-to-dropbox