Plex Movie Streaming

Rip and Copy Redbox DVD Rentals to PC and Mac


The article shows you the easiest way to rip and copy protected Redbox DVD rentals to PC and Mac so that you can watch Redbox DVD movies anytime you like. 

Do you Often rent DVD movies from Redbox? Why pay anything for a DVD rental ever again? Want to rip Redbox DVD to your computer so that you can watch it some other time or transfer it to your portable devices like iPhone, iPad, iPod, HTC, Samsung, etc.? You are definitely right being here! Just keep on reading to find out how to copy Redbox DVD Rentals to PC and Mac for keeping forever.


To backup Redbox DVDs, we highly recommend Pavtube DVDAid for Windows/Mac. With it, you can easily and quickly save your protected Redbox DVD movies to video formats like MP4, MOV, AVI, WMV, MKV, FLV, etc. and audio formats like MP3, OGG, AAC, WMA, WAV, FLAC, etc. smoothly bypassing the DVD copy protection. In addition, it works with 1:1 backup solution and convert DVD to Apple/Android/Windows Devices for watching, etc. It's ease of use, not fuss and simple to follow. Don't you like to have a try?


This Redbox DVD Ripper provides free trial (no time limitation) before purchase, just download it and follow the guide to accomplish your task. 


How to fast Backup, Copy and Rip Redbox DVD Rentals on PC and Mac? 

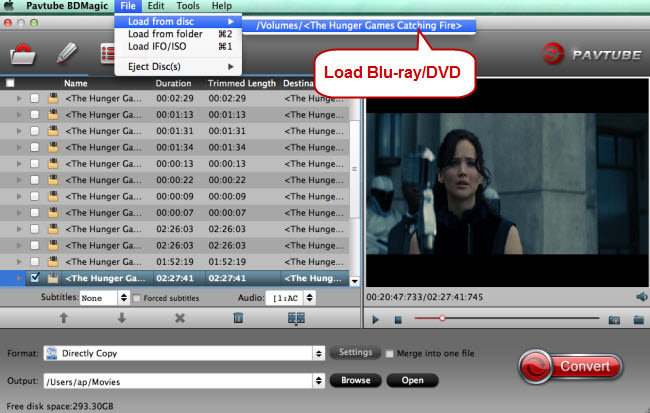
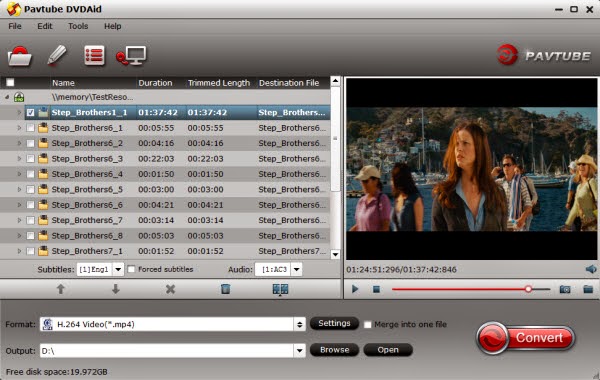
Step 1. Run Best DVD Ripper and import disc. 

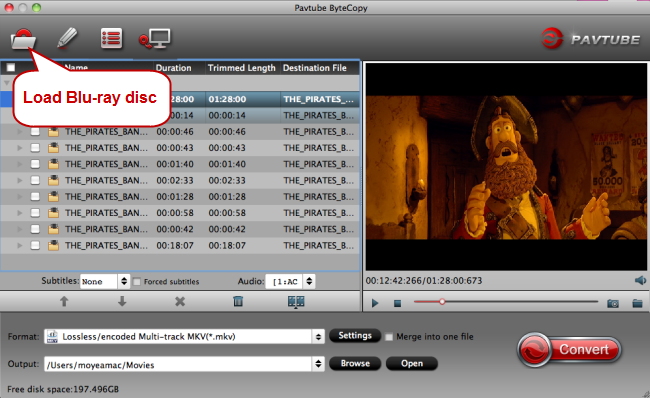
Click this icon to DVD disc from ROM, IFO/ISO or folder. I also noticed if you have a ISO file to import, it will recognize the ISO file automatically with no need to run virtual driver and mount ISO files firstly. Good design. 


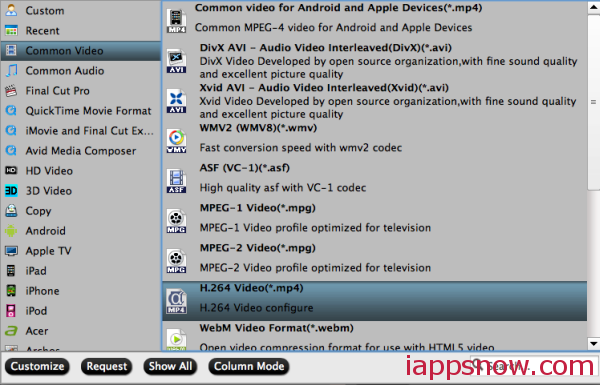
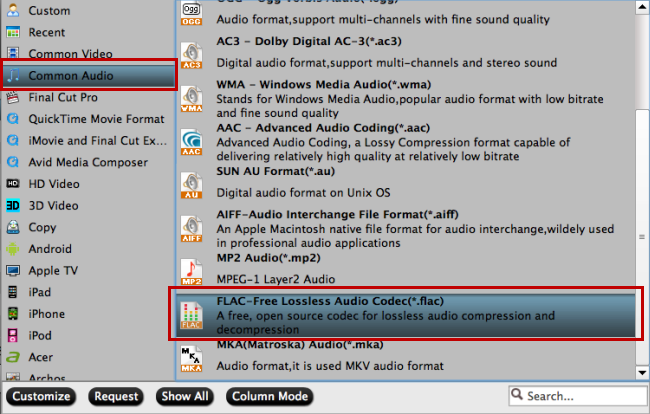
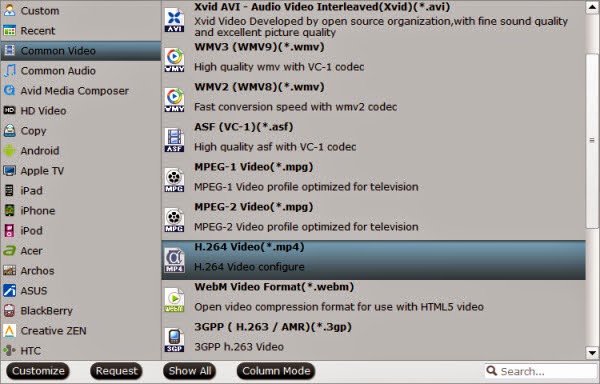
Step 2. Choose format. 

Click "Format" drop-down list and choose proper format for different using. 

a. DVD Ripper provides 150+ video presets for Google Nexus, Asus Transformer, Galaxy Tab, iPad, Apple TV, Nook HD and more, allowing you to convert DVD movies to fit your different portable media players, you can choose "Common Video > H.264 Video (*.mp4)”, or select corresponding video from “iPad” or “Android” or other option, to get a suitable video compatible with your device 


b. If you just want to copy DVD to DVD folder with original structures, please go to click the "computer" icon on the top to backup Redbox DVD Rentals with Original Structure. 


c. If you just want to copy main movie without extras, commentary etc. documents, please go to select "Copy>Directly Copy" to copy Movie Only from DVD discs. 


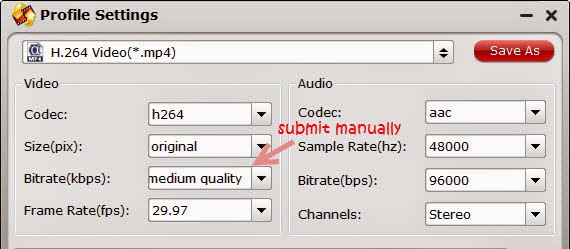
Step 3. Change video specs. (Optional) 

If you are not satisfied with default specs, then click "Settings" to enter Profiles Settings windows. You can customize video frame rate, bitrate, size and other settings freely. (It does not work for directly copy) 

Step 4. Start conversion. 

Click the big red "Convert" to start backing up or converting your Redbox DVD Rentals to a video, audio you want. Usually backup will be quicker because it does not need to do transcoding. 


After the conversion, click "Open output folder" to quick locate converted files. Now you have added another movie to DVD collection. Play it anywhere anytime you want. Also have some Blu-ray discs, learn how to backup Rented Blu-ray from RedBox, NetFlix, Amazon


More 

How to Play Blu-ray on PS3 with AC3 5.1 Audio? 
Import DVD to Avid Media Composer on Mac 
DVD to M3U8 - Convert DVD to M3U8 for Vitamio Streaming in Android 
Rip DVD to VLC on Mac OS X El Capitan 
How to Convert DVD to Digital Copy in Windows/Mac 
Review of Best 5 DVD to Music Rippers – Rip DVD to MP3/M4A/AAC/AC3 Audios 
Rip DTS-HD track on Blu-ray to FLAC 5.1 audio for playback 
Download and Import Youtube Video to iPad Air(2) for watching with Mac 


Src 

Stream Blu-ray via Plex to iPad 4 on Mac OS X El Capitan


Plex gives us an easy access to TV shows and movies at home or on the go. Are you looking for a way to backup Blu-ray to Plex for iPad 4 on Mac for sharing and streaming? If you wanna transfer your Blu-ray collection to Plex for streaming widely, just read on this article. We will focus on how to backup Blu-ray to Plex Media Server for streaming and playing on iPad 4 and other portable devices, media players, etc via Mac OS X El Capitan. 

Although Plex itself can’t play Blu-ray natively for Blu-ray encryption, there are many ways to rip Blu-ray to Plex supported formats. And to preserve the Blu-ray video and audio quality, the best workaround to get the job done is to rip Blu-ray movies to MP4 format that Plex Media Server/iPad 4 can easily support. 


There is a number of Blu-ray Ripping software available to help you convert Blu-rays videos if you want to play them on iPad 4 via Plex. The best program I can recommend here is called Pavtube BDMagic for Mac, which is available for Mac users. It is easy to use for conversion and editing and makes great quality copies of Blu-rays Collections . 

Actually, with it you can convert Blu-ray to almost all regular video formats like MP4, MOV, MKV, FLV, WMV, AVI, etc. and even extract MP3, WMA, FLAC, OGG, etc. audio from Blu-ray movies. Best of all, it allows you to copy your Blu-ray movies to hard drive with original structure or main movie only. If you’re using a Windows, please turn to Pavtube BDMagic, which enables you to convert Blu-ray to Plex Media Server for iPad 4 on Windows 10. 

Hot Search: DVD to Plex | YIFY videos to Plex | WTV files via Plex | Blu-ray to Plex | VIDEO_TS files to Plex 

Now you can follow the steps below to rip Blu-ray to Plex for steaming to iPad 4 via Mac 10.11 in a few clicks! 

The Steps: How to Rip/Stream Blu-ray over Plex to iPad 4via Mac OS X El Capitan 

Note: When ripping a Blu-ray disc, anywhere from 30 to 60 GB of hard disk space is needed depending on what you’re ripping. Blu-Rays are big, and we’re going to rip the whole thing to our drive first, so depending on the movie you’re ripping and the quality you want in your final movie file, you’ll need a good amount of space. 


Other Download: 

- Pavtube old official address: http://www.pavtube.cn/blu-ray-ripper-mac/ 
- Cnet Download: http://download.cnet.com/Pavtube-BDMagic/3000-7970_4-76177782.html 

Step 1: Insert your Blu-ray disc to your computer’s drive, then launch the Blu-ray ripping software and click the “Load Disc” button to have the Blu-ray content imported with a BD drive. You can also add DVD discs, VIDEO_TS folder, DVD ISO files are the source files for converting. 


Step 2: Choose subtitles (Optional) If you want to play Blu-ray rips with subtitles, just click the drop down menu after “Subtitles” to select your desired one. On the right windows, you can preview your files and take snapshots of your favorite movie scenes. 

Step 3: Choose output format Officially, the iPad 4 only supports MPEG-4 and H.264 with .mov, .m4v, and .mp4 extensions video, meaning that’s the only media recognized over Plex’ Direct Play. To stream Blu-ray over Plex to iPad 4, click “Format” bar and choose the “H.264 video (*.mp4)” profile from the “Common” Video category. 


Step 4: Advanced Settings (Optional) With the right settings you can retain the quality of the original Blu-ray while also saving space. This is particularly helpful when streaming over your network, depending on your network quality. Simply click Settings bar and you can tweak the settings to your satisfaction and even save it as preset. Below is my best format settings for ripping Blu-ray content to Plex, you can take it as reference: 

Step 5: Start ripping Hit the “Convert” button at the bottom of the main interface to start the conversion. It will automatically convert Blu-ray to Plex Media Server compatible video files for further streaming to play on iPad 4. 

Once the conversion is finished, click “Open” to quickly find the converted movies. Then, Add the converted movies to Plex and Plex will recognize, catalog, play and stream these Blu-ray files to iPad 4 via Mac OS X El Capitan at ease. 

Additional Tips: 

As mentionded above, officially, the iPad 4 only supports MPEG-4 and H.264 with .mov, .m4v, and .mp4 extensions video, meaning that’s the only media recognized over USB and Plex’ Direct Play. If you want to prepare all of your media files (VOB, MKV, AVI, MPG, DVD and Blu-ray) for playback on iPad 4, you can get Pavtube Video Converter Ultimate (an all-in-one video, DVD and Blu-ray solution) to achieve your goal smoothly. 


Src 


Play MKV, AVI, MP4, FLV, WMV, MPG, MOV by Chromecast 
Rip DTS-HD track to FLAC 5.1 audio using Plex 
Upload Blu-ray to Dropbox for Sharing 
Backup DVD onto Synology DS216play Via Mac El Capitan 
How to watch 3D Videos on Galaxy Note 4 with Gear VR 
Blu-ray to iTunes Converter -Sync Blu-rays to iTunes for Apple Devices 
Watch iTunes Movie on Android Tablet or Smartphone 
Play Blu-ray ISO with HEVC MP4 on Mac OS X El Capitan 

More 

Stream Blu-ray via Plex to iPad 4 on Mac OS X El Capitan 


Rip DTS-HD track to FLAC 5.1 audio using Plex

Q: “Has anyone else been ripping 5.1 DTS-HD audio from Blurays using the FLAC option in MakeMKV? As DTS-HD seems to be completely useless if you own a Mac, I thought I would try to rip lossless audio from a Blu-ray using the FLAC option in MakeMKV. My Mac is connected to the AV receiver via an optical cable and when playing the file back via Plex it did produce multichannel sound but my AV receiver seemed to think it was decoding Dolby Digital (?) Thanks.”


Rip DTS-HD track to FLAC 5.1 audio using Plex


Part I: How to Freely Converting Blu-ray HD audio to FLAC 5.1 audio 

As I mentioned in my first look at ripping Blu-rays, converting uncompressed PCM and lossless Dolby TrueHD and DTS-HD Master Audio to FLAC with 5.1 audio for use in Plex carries a number of benefits. 

  • It's also lossless, so no quality difference.
  • FLAC is an open, well-documented format and so you're not reliant on reverse-engineered implementations.
  • XBMC can decode FLAC to PCM and output it over HDMI, whereas it currently can't for DTS-HD.
  • Hard drive space savings can be significant, especially for PCM soundtracks.


There's little penalty in terms of the time taken to rip the disc either, as it's unlikely that your BD drive can copy data from the disc fast enough for the conversion process to become a bottleneck.What you need: This process still usesMakeMKV, with the feature enabled in by checking the advanced options box in the settings. TrueHD decoding is built in, but you'll need to find a separate DTS module and point MakeMKV to that. All you then need to do it choose the ‘FLAC’ preset when ripping a disc. Otherwise the process is identical. 

Part II: Use Top Blu-ray Audio to FLAC Ripper for Plex to Convert a pure audio Blu-ray Audio to FLAC audio files with 5.1 audio on Mac 

To extract Blu-ray discs to Plex accepted FLAC audio files on Mac, you could usePavtube ByteCopy for Mac which is an effective Mac Blu-ray Audio Converter that could Convert Blu-ray music to lossless FLAC 5.1 audio format. Still delivering an ultra-high quality listening experience on Mac. Read the review

  
Hot News for all Mac users! Pavtube Studio has launched a user-requested upgrade for all its Mac BD/DVD and package tools: DVDAid for Mac, BDMagic for Mac, ByteCopy for Mac, iMedia Converter for Mac to version 4.8.5.1, which focuses on the addition of the H.265 encoders and decoders. 

Step 1: Install and launch the Mac Blu-ray Audio to FLAC Ripper (Windows version:Pavtube ByteCopy ); import your Blu-ray Disc or Backup saved on hard drive by clicking “Load File” icon. 


Step 2. Choose Lossless FLAC audio format. Here click the format bar to follow “Common Audio” and “FLAC-Free Lossless Audio Codec (*.flac).” as the output format. 

Output Audio Format: WMA (with 7.1 channels), AAC (with 5.1 channels), AC3 (with 5.1 channels), MKA (with 5.1 channels), MP3, WAV, M4A, OGG, WMA, AU, AIFF, MP2, FLAC. 


Note: Clicking Pavtube format list, we can clearly find FLAC-Free Lossless Audio Codec(*.flac) preset. But hitting “Settings”, the offered sample rate is limited to 22050hz, 32000hz, 44100hz and 48000hz. It works smoothly without most devices before, but if you want to get better audio quality by improving the sample rate (to 96000hz, ect.), this guide is right here to help. When you select AC3 as output audio format, you have the choice to select Channels as 5.1 Channels. 

Step 4. Convert pure audio Blu-ray to lossless FLAC 

Click the red button on bottom-right corner to realize conversion from high fidelity pure audio Blu-ray to lossless FLAC for VLC. After completing conversion from high fidelity pure audio Blu-ray to lossless FLAC, you can streaming the converted pure audio Blu-ray for VLC with Hi-res audio quality. 

In addition, Pavtube ByteCopy for Mac can convert latest Blu-ray and DVD movies to any other formats like MP4, MOV , M4V, AVI, WMV, MPG, MKV, etc or MP4/MOV with multi-track audios for playback and it is also able to encode Blu-ray movies and DVDs to MKV container format with preserving chapter markers, multiple audio tracks and subtitles. 


More 

Play 3D Blu-ray on VR via Oculus Cinema? 
How to enable stream Blu-ray movies on Raspberry Pi 2 rasplex via Plex? 
2016 Easter Coupon: Lowest Price for DVD Ripper/Copier Software 
How to rip and store DVD on Plex Media Sever for free streaming 

How to keep the original DTS HD-MA audio track from Blu-ray Disc?


DTS-HD Master Audio is a lossless audio codec created by Digital Theater System, which is an optional audio format for both Blu-ray Disc and HD DVD. It is able to deliver all of the information from the original master recording, allow a bit-to-bit representation of what the sound engineers laid down. 


DTS-HD Master Audio can deliver unprecedented home theater experience, thus users may have the need of backing up their Blu-ray with keeping DTS-HD Master Audio, like the question below: 

I have some Blu-ray videos (i.e. Star Trak Into Darkness and The Maze Runner) and want to rip them into MKV with lossess audio/video keeping original DTSHD-MA audio track for playing on a laptop through Plex to my Chromecast and Plex Home Theater. Any easy way? 

To see how it works, please refer to below guide for lossless backup Blu-ray to MKV with DTS-HD Master Audio preserving. 

Firstly, you should have download and installed the Blu-ray to MKV Converter. With luck,Pavtube ByteCopy is here for you, which is able to read original DTS Master Audio or Dolby TrueHD, and output them as 5.1 as well as 7.1 channels. (Read Top Blu-ray Ripper Reviews) Overall, it enables you to transcode Blu-ray and DVD to lossless mkv without losing quality and keep its original and perfect DTS-HD Master Audio. You can download Multi-track Blu-ray ripper by using the link below. If you wanna a Mac version, please go to Pavtube Bytecopy for Mac. Now let’s go. 


Step 1. Launch it and load your Blu-ray movie. (Learn how to copy Blu-ray with chapter markers


Step 2. To keep the original DTS HD-MA audio track when ripping Blu-ray movie, go to “Format” to find “Multi-track Video” catalogue. Select “Loss/encoded Multi-track MKV(*.mkv)”, which will provide lossless backup Blu-ray to MKV with multiple audio and subtitle tracks. 


Tip: If you want to remove unwanted audio or subtitle stream from original Blu-ray for output, just unselect the box in front of it. Do remember not to check the encode option under “Audio” tab if you don’t want to change audio parameters. 

Step 3. Click “Convert” to start lossless converting Blu-ray to MKV and keeping multi-track/stream. The conversion can be completed within a short time, then click “Open” to find generated MKV files. 

With a very easy operation, you get the lossless MKV files from Blu-ray, which make you to enjoy movies with high quality anytime you like via Plex. 

However, what Bytecopy can do is more than it, let’s go to below tips to find more. 

1. You may be confused about the other two options under “Multi-track Video” catalogue: Muti-track MP4(*.mp4)and Multi-track MOV(*.mov). They are used to transcode BD/DVD to .mp4 and .mov output files. The point is that they support saving encoded multiple audio tracks. So you could enjoy it in your Android, iPhone, iPad, Apple TV 3, Windows devices and more portable devices. 

2. Or another way to get original DTS HD-MA audio track is to hit the “Copy entire disc” icon on the top to backup Blu-ray into a BDMV folder


More 

Rip/Convert DVD ISO/IFO Movies on Mac OS X El Capitan 
Upload DVDs to Dropbox for viewing anywhere 
How to Get all DVDs into Synology NAS drive for Streaming 
Put DVD to Zeiss VR One for Enjoyment via Oculus Cinema 
Watch Blu-ray movies to Samsung Galaxy Tab S 10.5 and 8.4 
How to play MKV, AVI, VOB, Tivo, WMV, MPG, FLV, F4V on Kindle Fire HDX 7 
PlayStation 4 can now play 3D Blu-ray discs 
MP4 won’t display on Apple TV- Converting MP4 to M4V for Apple TV 

Src 
Backup a Blu-ray movie keeping DTS-HD Master Audio

How to Get all DVDs into Synology NAS drive for Streaming


If you some DVD discs, do you want to put them into Synology NAS for sharing on media streamers, just read on this article to get solution to stream DVD to NAS. 

NAS is just a big file storage really and you may find that just copying the DVD files to Synology NAS directly is a pain to try and play with a media streamer(PS3, WD TV, etc). Then which is the best way to take the DVDs and put the DVD movies on NAS drive for playing on most media streamers… 
 
First, a quick note: we know that there is still a lot of legal ambiguity around ripping content that you have legally purchased. At Audioholics, we believe that you should be able to watch purchased media on your system regardless of whether it's coming from a standalone DVD player or a media center frontend. Actually, it's not as difficult as you imagine. To get DVDs on Synology NAS, you'll need a third-party DVD ripping software. 

Most of you are likely familiar with the excellent Handbrake for ripping standard Def DVDs, but it still cannot yet protected DVD discs. The way it can with regular DVDs, so you'll need to add an intermediate step. Pavtube DVDAid is the bee's knees, which can help you fast rip DVD discs to a format playble by NAS while keeping the original quality. (Read thereview

With it, ripping DVD for Synology NAS is simple as ABC. After downloding, follow the wizard to install and run the program. The mac version is DVDAid for Mac. Then follow the steps below to convert DVD to Synology NAS comaptible formats in a few clicks! 
How to rip and stream DVD movies via Synology NAS 

Step 1: Insert your DVD disc into DVD ROM, Launch the program and click the "Disc" button to import the DVD movies. DVD folder and ISO/IFO files are also supported. You can select subtitles as you want.


Step 2: Click Format and choose MP4 video from Common Video, which can be recognized by Synology NAS well. MKV is also a good choice; as a container format it takes whatever you give it. And then click the Browse button to specify an output folder to save the converted files. 
 

Tip:
 With the right settings you can retain the quality of the original DVD while also saving space. This is particularly helpful when streaming over your network, depending on your network quality. Simply click Settings bar and you can tweak the settings to your satisfaction and even save it as preset. 


Step 3: Finally, hit the "Convert" button at the bottom of the main interface to start the conversion. It will automatically convert DVD to Synology NAS compatible video files. 

Once the conversion is finished, click "Open" to quickly find the converted movies. Then, Synology NAS will recognize, catalog, play and stream these DVD rips at ease. 

More 

Apple iPhone 6 and iPhone 6 Plus on Pavtube Special Topic 
Dropbox brings Mailbox to Android, launches Carousel 
How to get the World Cup Schedule in Google Calendar 
Rip a DVD ISO to MKV for streaming via Plex with multi audio tracks 
Does Samsung Galaxy TabPro 10.1 supports 720p/1080p MKV Video Playback 
Play TiVo recordings on Kindle Fire HDX, Kindle Fire HD and Kindle Fire 
Strore DVD ISO onto QNAP with VLC server and stream to Sony Bravia TV 
Convert AVI from MiniDV cassettes to Apple TV with AC3 5.1 

Src 
How to Get all DVDs into Synology NAS drive for Streaming